MyIPS User Guide
MyIPS helps you create and share a personal health summary that you can bring to any medical appointment or emergency. Everything is stored on your phone — nothing is sent to a server.
Contents
- Introduction
- Getting around the app
- 1. My Details
- 2. My Medications
- 3. My Allergies / Intolerances
- 4. My Health Concerns
- 5. My Immunisations
- 6. My Procedures
- 7. My Pregnancy
- 8. My Lab Results
- 9. My Imaging Results
- 10. My Vital Signs
- 11. My Medical Devices
- 12. My Care Team
- 13. My Health Story
- 14. Sharing your health summary
- 15. Importing health data
- 16. Advanced Features
- 17. Privacy & Security
- Appendix: Standards and terminology
Introduction
What is MyIPS?
MyIPS lets you build a personal health summary on your phone. You record your medications, allergies, health concerns, immunisations, procedures, lab and imaging results, and personal details once, then share the summary with a doctor, specialist, or emergency responder whenever you need to. The summary follows an international standard called the International Patient Summary, which means it can be read by clinical systems around the world.
You don’t need a medical background to use it. The app uses plain language throughout, and you can fill in as much or as little as you know.
Your data stays on your phone
MyIPS has no account and no server. Every piece of information you enter is stored in an encrypted database on your device. Nothing leaves your phone unless you explicitly share it using the Share button. Deleting the app removes all your data permanently.
What to fill in first
Start with My Details — your name, date of birth, and contact information. Then work through the clinical sections in order: My Medications, My Allergies / Intolerances, My Health Concerns, My Immunisations, My Procedures, My Lab Results, My Imaging Results, My Vital Signs, and My Medical Devices. Finally, add any extra context in My Health Story. You can come back and update any section at any time.
Getting around the app
The Summary screen (home)
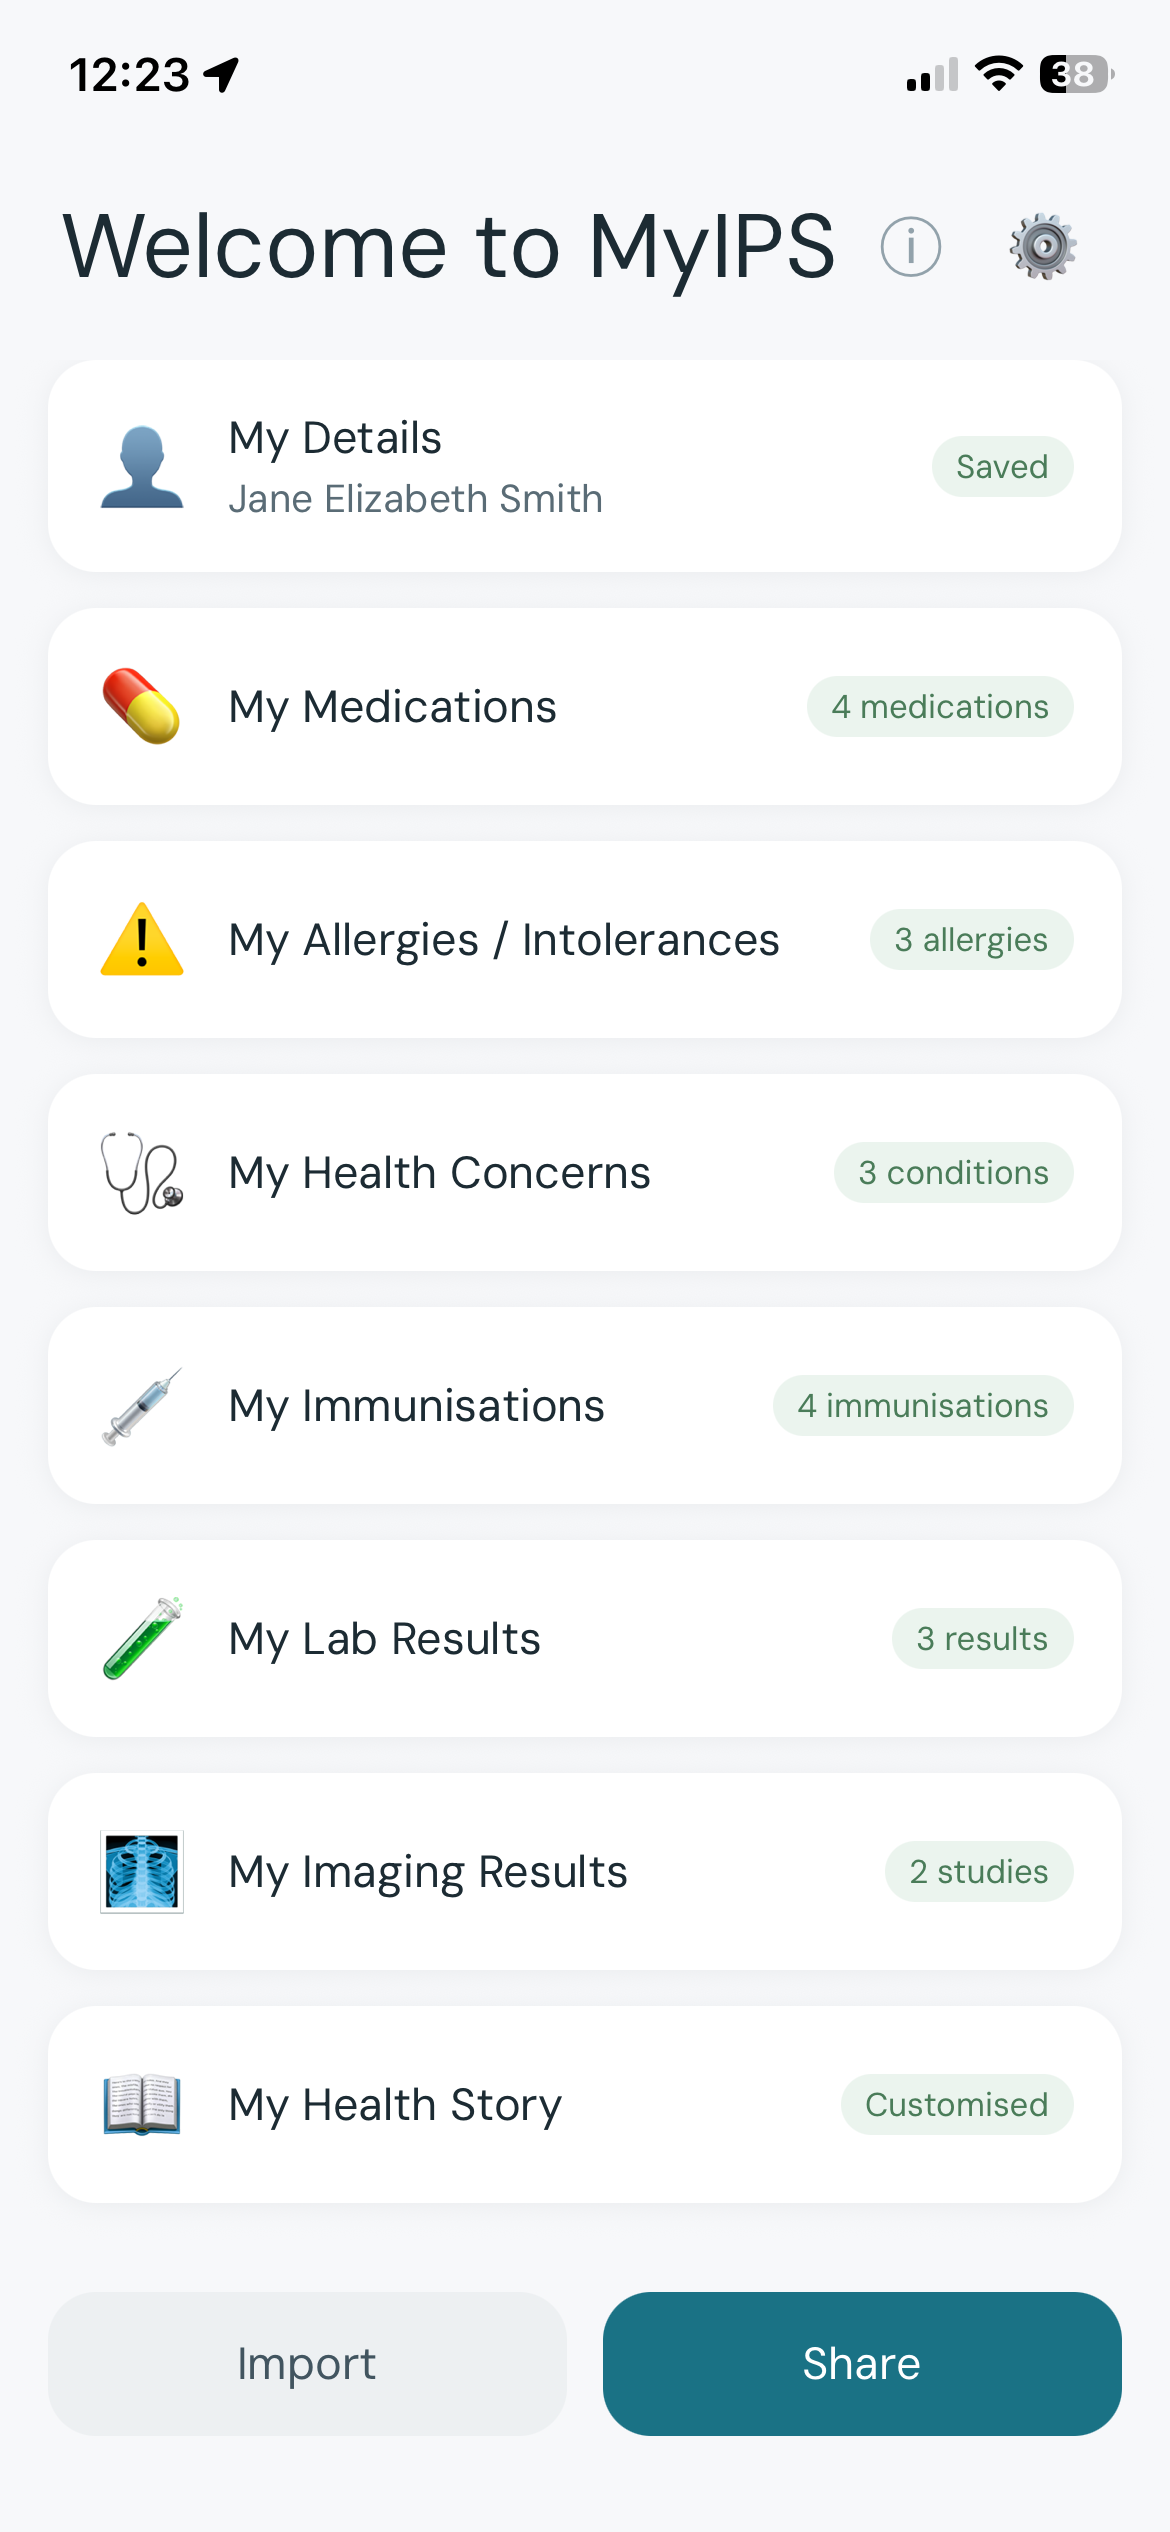
When you open MyIPS you land on the Summary screen. It shows:
- Section cards — My Details, My Medications, My Allergies / Intolerances, My Health Concerns, My Immunisations, My Procedures, My Lab Results, My Imaging Results, My Vital Signs, and My Medical Devices. Each card shows a brief status of what you have recorded.
- My Health Story card — at the bottom, showing any section notes and your personal narrative.
- Share button — tap to share your health summary as a PDF or data file.
- Import button — tap to import health data from a file or a QR code.
- Info button (ⓘ) — top right; shows the About MyIPS introduction.
- Gear icon (⚙) — top right; opens Advanced Features.
Opening a section
Tap any section card to open that section.
Going back
iOS: Swipe right from the left edge of the screen, or tap the ‹ back arrow at the top left. Android: Use the system back gesture (swipe inward from either edge) or tap the ‹ back arrow at the top left.
Share, Import, and Advanced Features
Tapping Share, Import, or the gear icon opens a new screen that slides up from the bottom.
iOS: Swipe down from the top of the screen to go back, or tap the ‹ back arrow at the top left. Android: Tap the system back button or tap the ‹ back arrow at the top left.
How saving works
There is no Save button in MyIPS. Changes save automatically:
- Most fields — saved as soon as you move focus to another field or leave the screen.
- Text notes — saved with a short delay after you stop typing. A small Saving… indicator appears while the save is in progress, replaced by Saved when complete.
You never need to remember to save. If you close the app while a note is saving, the data will be saved when you next open the app.
Tidy text and length hints
A few small touches keep your records clean and shareable:
- Pasted text is tidied automatically. When you paste from another app, MyIPS quietly removes invisible junk (stray control characters, hidden formatting) and emoji that don’t belong in a clinical record. Ordinary letters, accents, and scientific symbols such as
°,±, andµare always kept. - Length hints. Some fields show a small “N characters left” hint as you approach their limit. Short identity fields (names, ID numbers) have a firm limit; longer clinical and free-text fields show a gentle notice if an entry is so long it may be too large to share by QR code. You are never blocked from saving, and your text is never silently cut off.
1. My Details
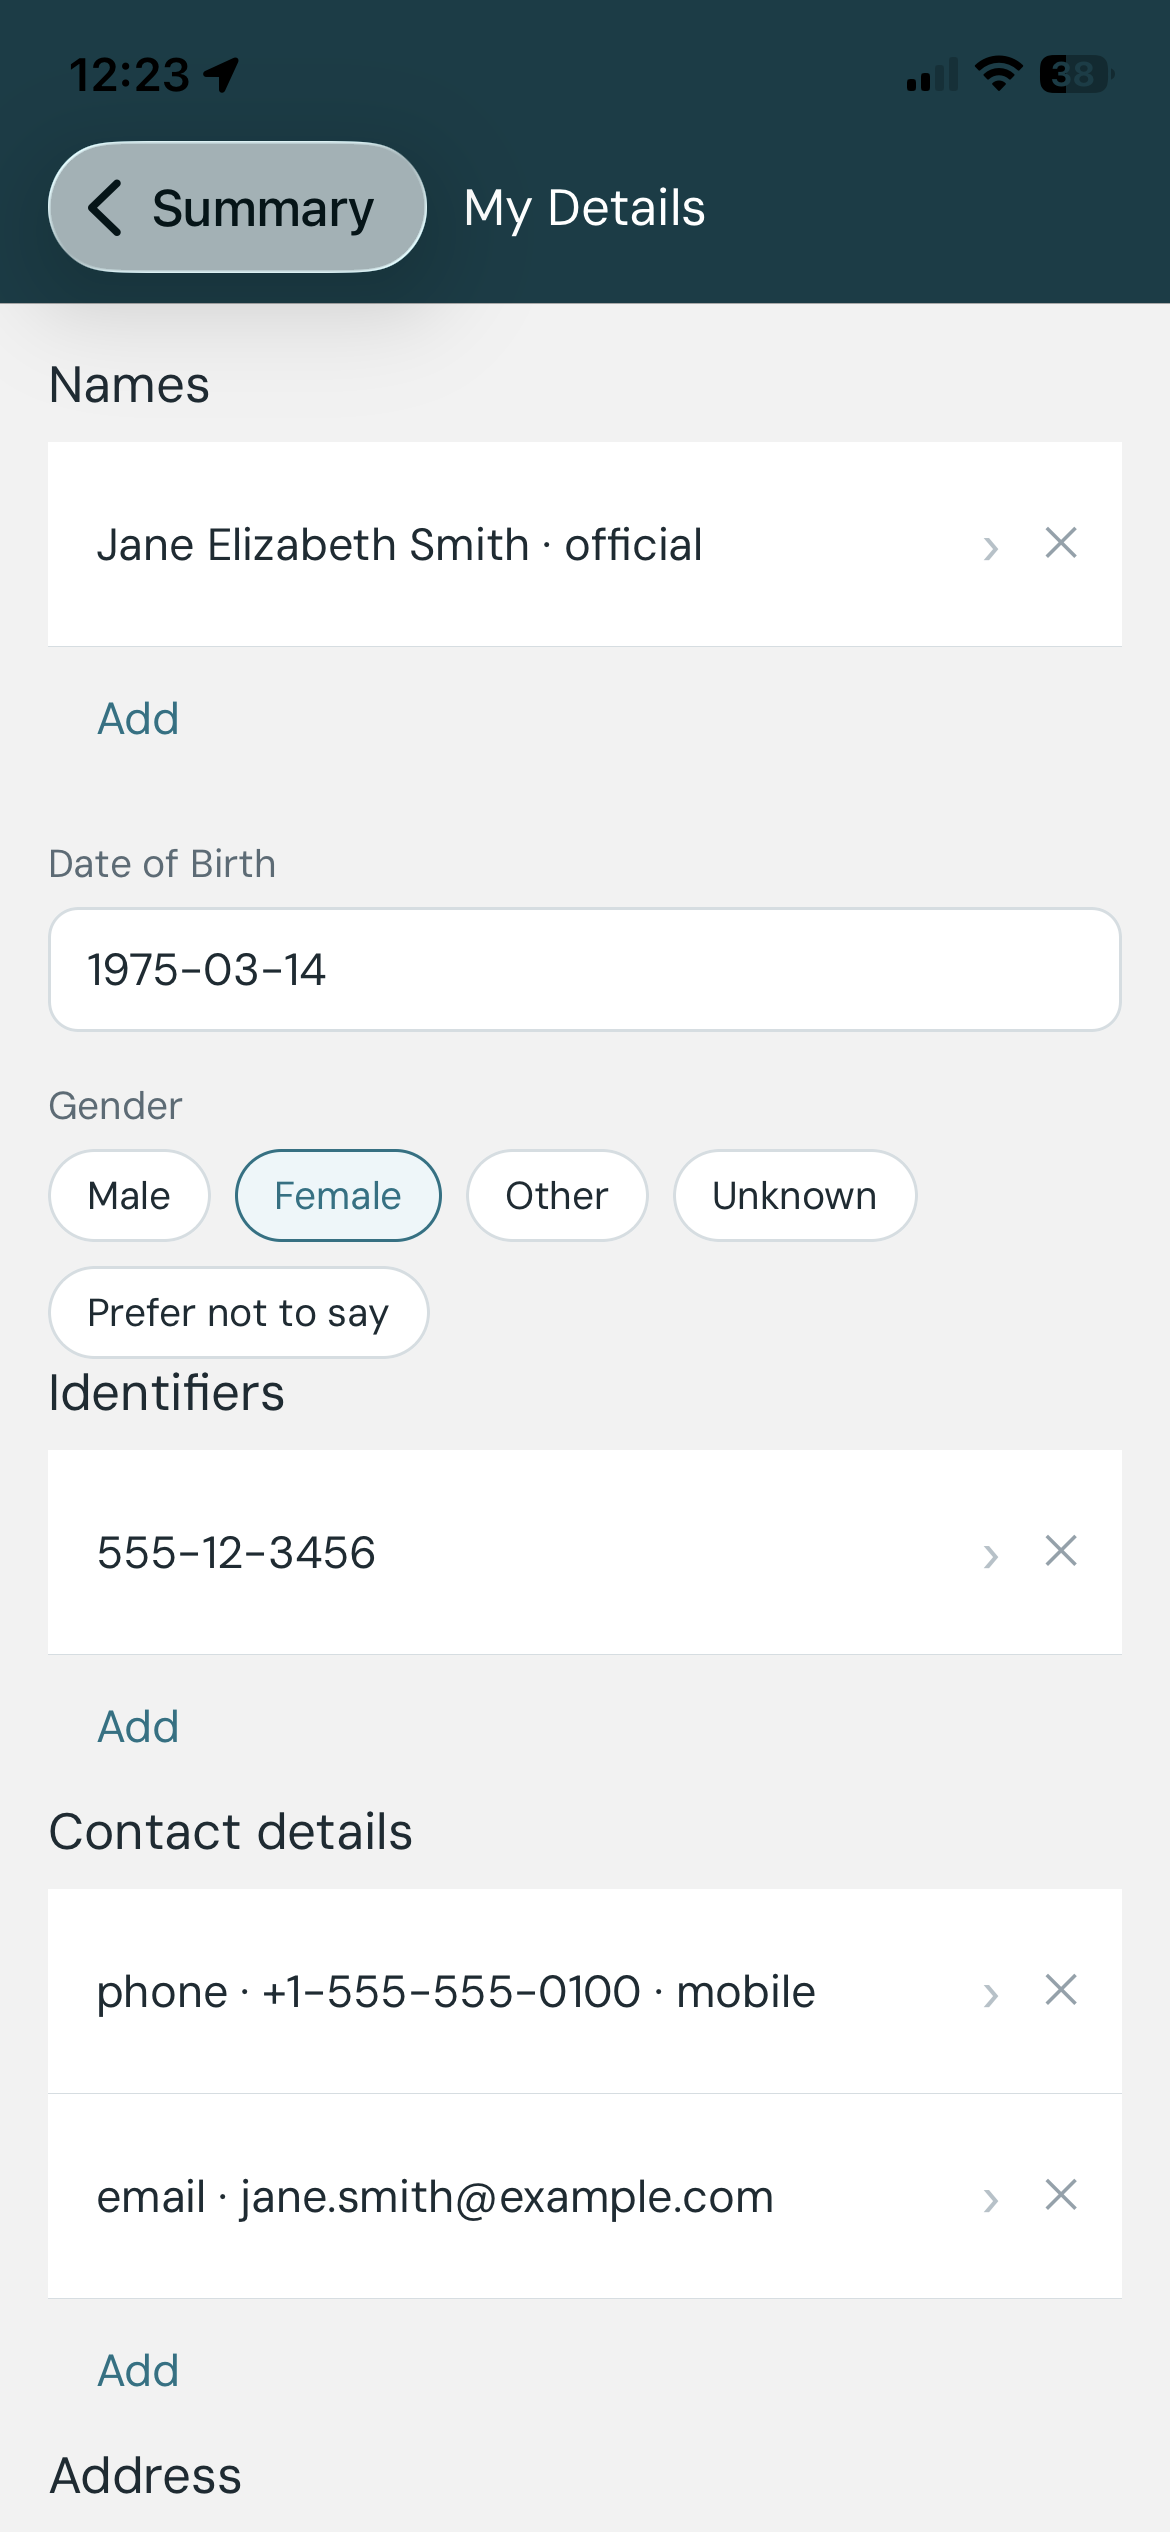
My Details stores your personal and administrative information. Clinicians use this to identify you and contact you or your next of kin.
Saving is automatic — just fill in the fields and move on.
Names
You can add one or more names. For each name:
- Given name — your first name(s).
- Family name — your surname.
- Name type — choose how this name is used:
- Usual — the name you go by day-to-day.
- Official — the name on your legal documents.
- Nickname — an informal name.
- Maiden — a name used before marriage.
- Anonymous — a placeholder used when identity is protected.
- Old — a name you no longer use.
- Temp — a temporary name.
Most people only need one name entry. Add a second if your legal name and the name you use clinically differ.
Date of birth
Enter your date of birth in YYYY-MM-DD format (for example, 1985-03-22). Partial dates are accepted: enter just the year (1985) or year and month (1985-03) if you don’t know the full date.
Gender
Select the gender identity you want recorded on your health summary. Options include Male, Female, Other, and Prefer not to say.
Identifiers
Identifiers link your health summary to official records. Options include:
- Passport number
- Driver’s licence number
- National health ID (Medicare number, NHS number, or equivalent in your country)
- Other — any other identifying number
Privacy notice: Identifier numbers are stored only on your device. They are included in exported files (PDF and data file). Only include identifiers you are comfortable sharing with the people you share your summary with.
Contact details
Add your phone number, email address, or fax number. Tap + Add contact to add multiple entries. For each entry, select the type (Phone, Email, Fax) and enter the value.
Address
Enter your home or postal address. Fields:
- Street — house number and street name.
- City
- State / Province
- Postal code
- Country
- Address type — Physical (where you live), Postal (where you receive mail), or Both.
Your GP / primary care doctor is now recorded in My Care Team (see that section), not here.
Emergency contacts
Add people who should be contacted if you are incapacitated. For each contact:
- Name
- Relationship — choose one: Emergency Contact, Next of Kin, Caregiver, Guardian, or Power of Attorney.
- Phone or Email
You can add multiple emergency contacts. Tap + Add emergency contact to add another.
Languages
Record the languages you speak for clinical communication. This helps clinical staff know which language to use when treating you. Tap + Add language to add entries.
2. My Medications
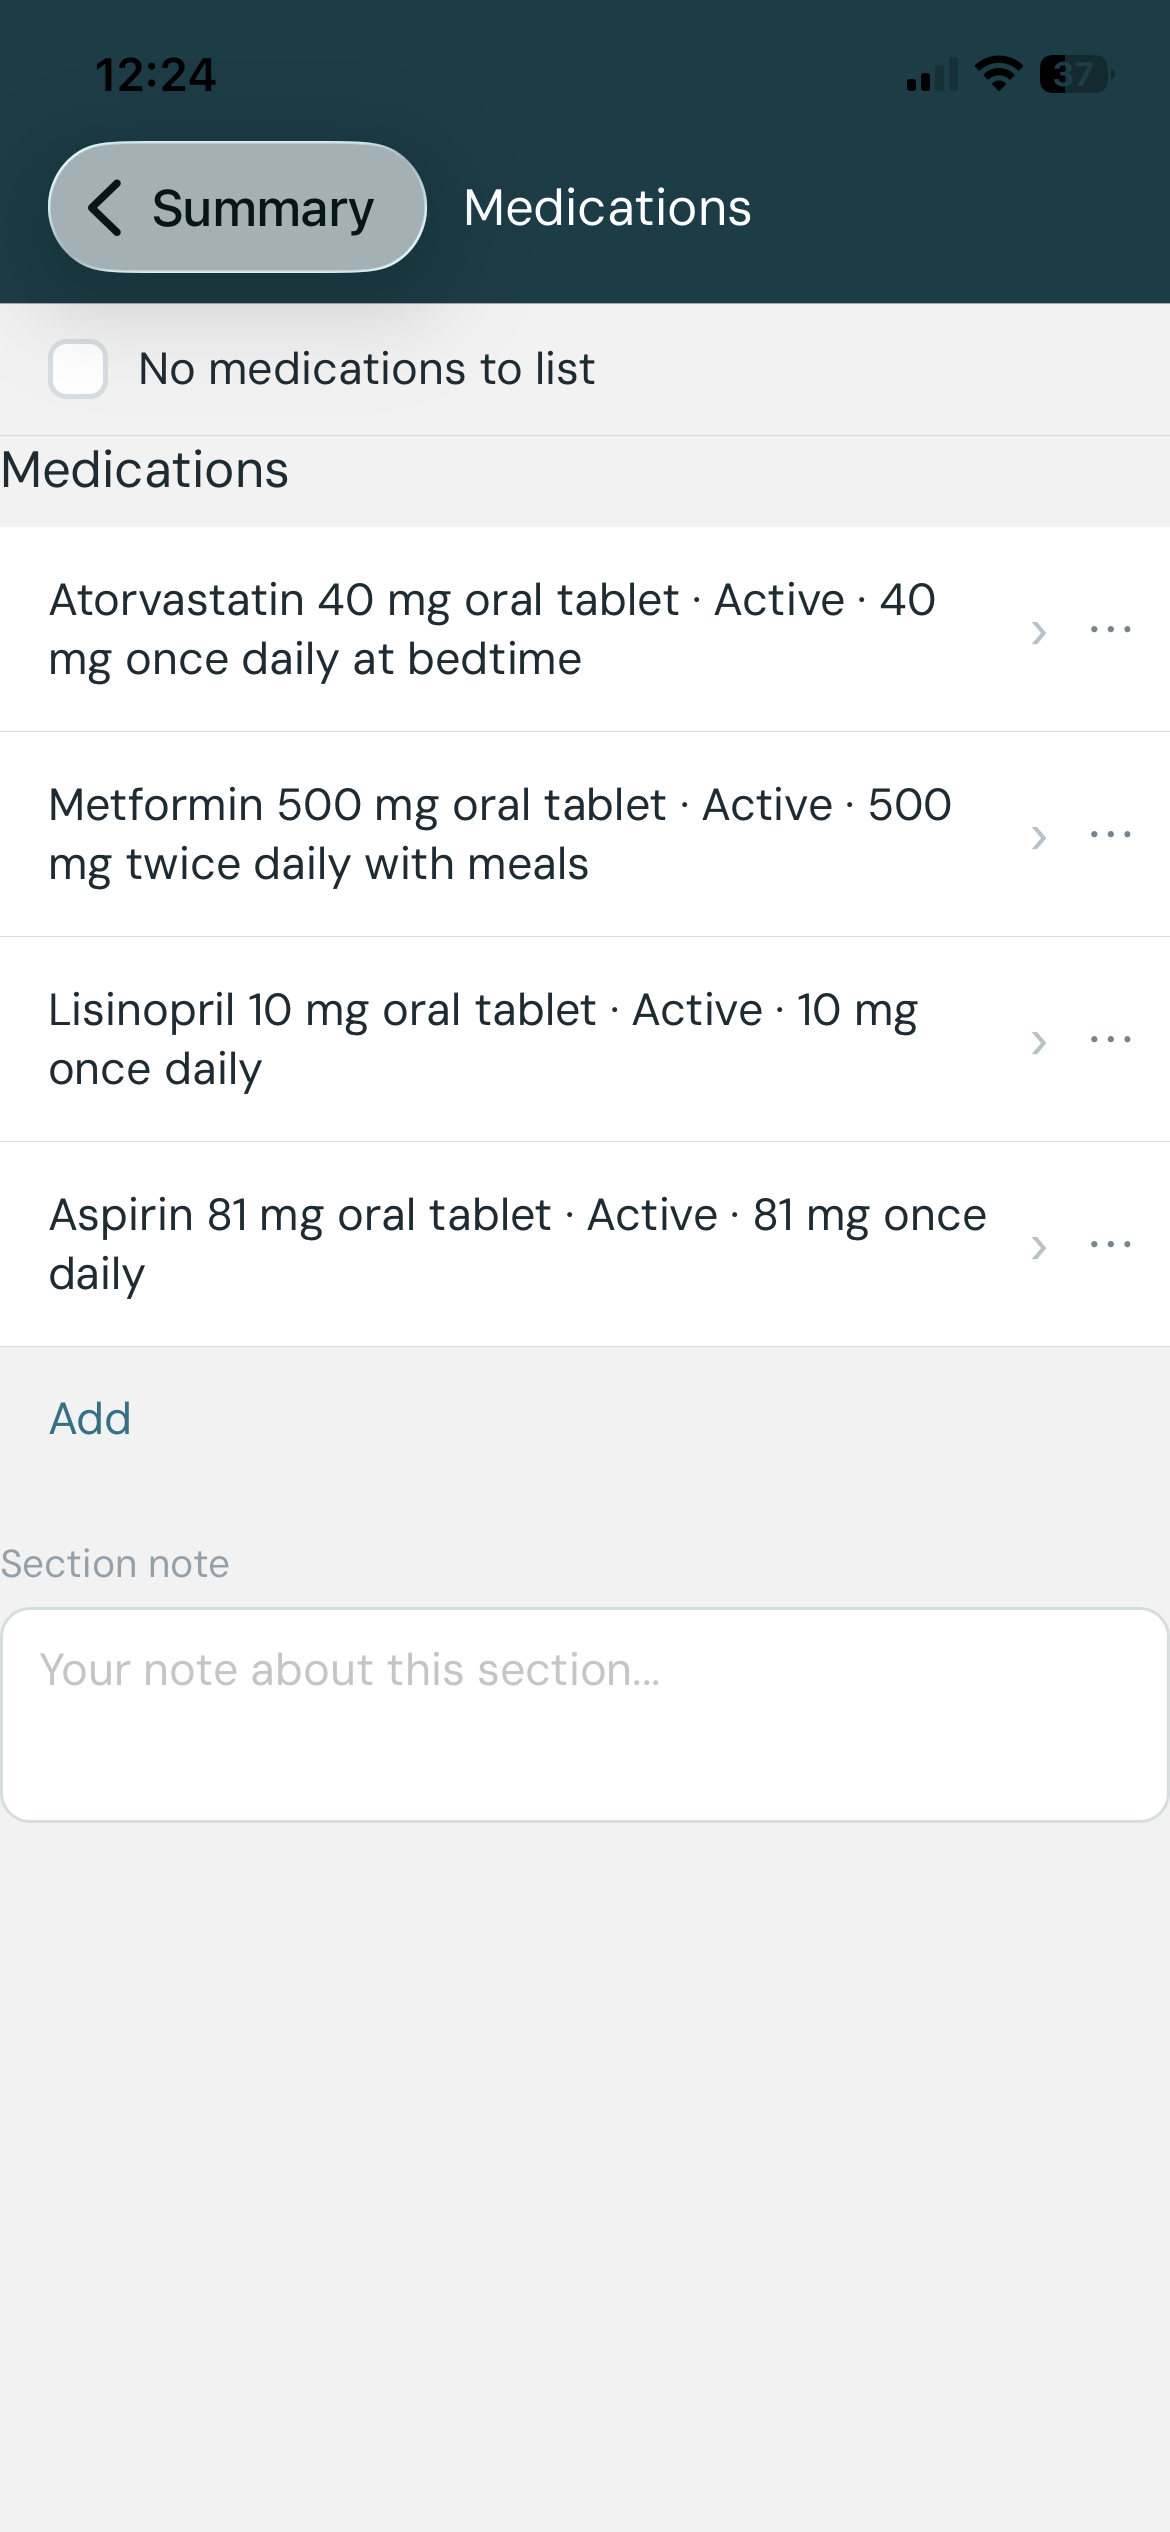
My Medications records the medicines you currently take or have taken.
Adding a medication
Tap the + button to add a medication. A search field appears — type the medicine name to search a built-in database of common medicines. If your medicine is not listed, select “Use as typed” to save the name exactly as you entered it.
📸 Screenshot — Add medication form on iOS (
medications-ios-add-form.png) and Android (medications-android-add-form.png).
Field guide
- Medicine name — the name of the medication, brand or generic.
- Dosage instructions — free text. Describe how you take it, for example: “1 tablet twice daily with food” or “10mg at bedtime”.
- Status — how you are currently using this medication:
- Active — you are taking it now.
- Stopped — you have permanently stopped taking it.
- On hold — you have temporarily stopped (for example, before surgery).
- Route — how you take the medication:
- Oral — swallowed (tablets, capsules, liquids).
- Topical — applied to the skin (creams, patches).
- Inhaled — breathed in (inhalers, nebulisers).
- IV — given directly into a vein (intravenous infusion).
- Subcutaneous — injected under the skin (insulin pens, auto-injectors).
- Intramuscular — injected into a muscle.
- Date started — when you started taking it. Use YYYY-MM-DD; partial dates (YYYY or YYYY-MM) are accepted.
- Date stopped — when you stopped (if applicable). Same format as Date started.
Tips for finding the right medicine in the search
The medicine database contains clinical names, which can produce a long list of very similar-looking results. These tips will help you narrow it down quickly.
Search by ingredient, not brand name. Brand names vary by country and change over time. The clinical ingredient name — the active substance in the medicine — works everywhere. For example, search “amoxicillin” rather than “Amoxil” or “Trimox”.
Add the strength to cut the list down. Once you see too many results, add a space and the dose number from your prescription or packet. For example:
- “amoxi 500” — finds amoxicillin 500 mg entries
- “metformin 1000” — finds metformin 1000 mg entries
- “atorvastatin 40” — finds atorvastatin 40 mg entries
You don’t need to type the full ingredient name — a recognisable fragment plus the strength is usually enough to bring the right entry to the top.
Ignore entries that look identical. The database distinguishes between different forms (capsule, tablet, oral suspension) and exact strengths. If you’re not sure which form matches, pick the one that looks closest and record the exact details in the Dosage instructions field below.
Nothing matches? Use “Use as typed”. If you can’t find your medicine after a few attempts, select “Use as typed” at the bottom of the results. The name you typed will be saved exactly as entered. This is perfectly fine — the most important information is that the medicine is recorded, not that it has a clinical code attached.
No medications to list
If you take no medications, switch on the No medications to list toggle instead of leaving the list empty. This makes it clear to clinicians that you have actively confirmed you take nothing — rather than simply not having filled in this section yet. When you share your summary, the Medications section stays visible and is marked none known, so a clinician can see you confirmed it rather than just skipped it.
If you already have medications recorded, switching on the toggle will ask you to confirm before deleting them. Tap Clear all to proceed, or Cancel to keep your existing entries.
Editing a medication
Tap any medication entry in the list to open the edit form. Make your changes; they save automatically when you leave the form.
Deleting a medication
iOS: Swipe left on the medication entry to reveal the Delete button, then tap it. Alternatively, open the edit form and tap Delete at the bottom. Android: Tap the trash icon next to the entry, or open the edit form and tap Delete at the bottom.
Section note
At the bottom of the My Medications screen is a Section note field. Use it to add any free-text context about your medications overall — for example, notes about a recent change, a medication you react badly to, or anything else that does not fit in the individual fields. This note appears in My Health Story.
3. My Allergies / Intolerances
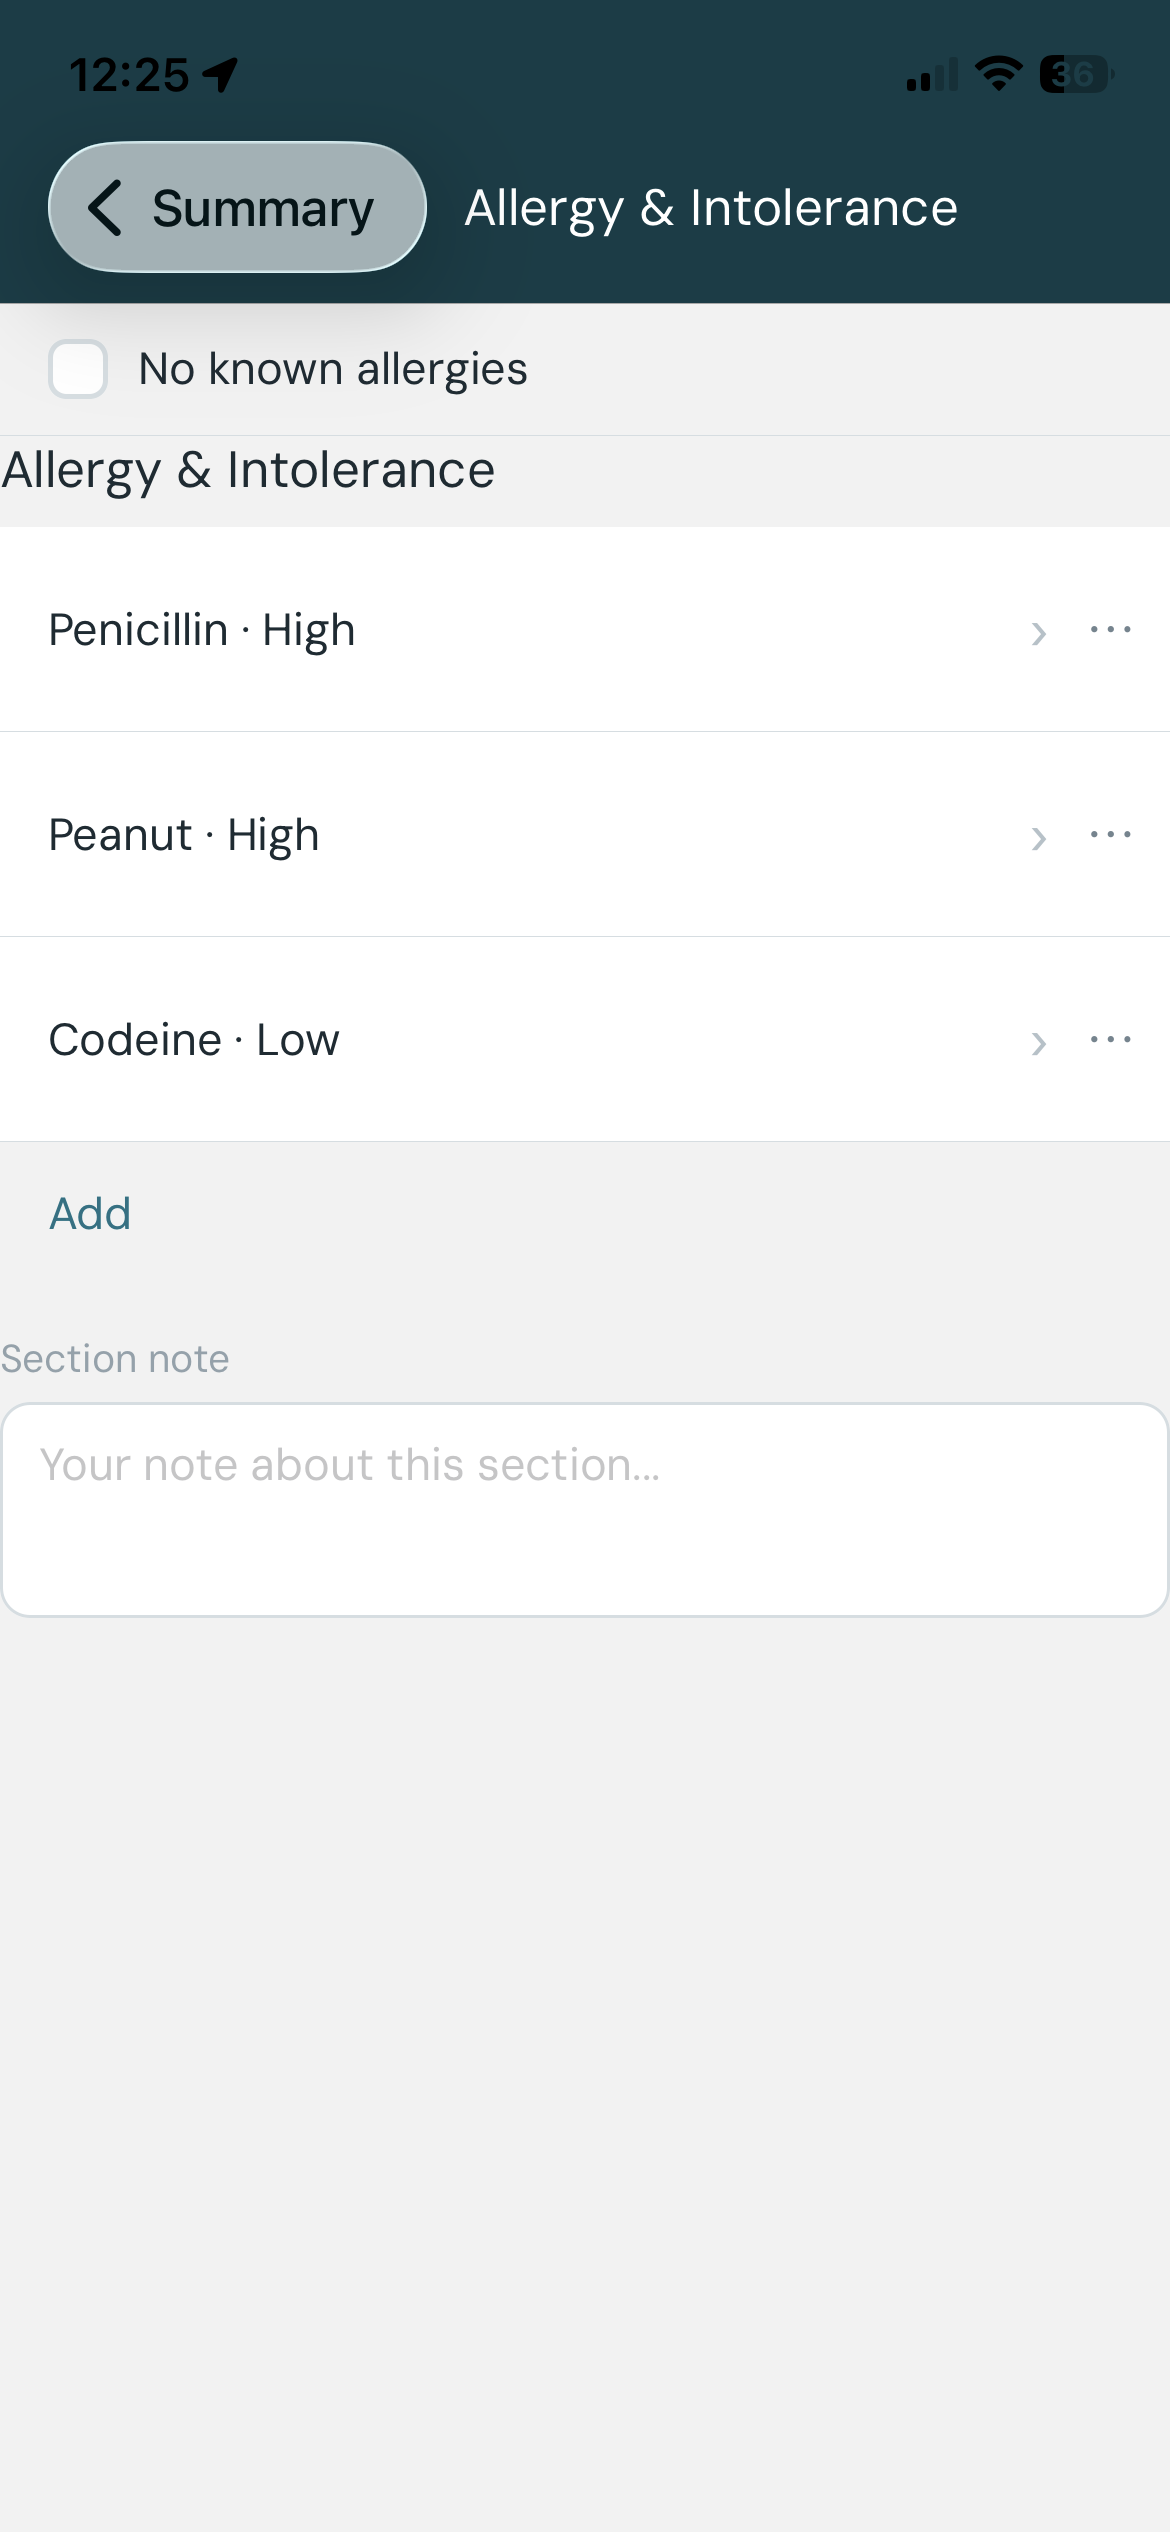
My Allergies / Intolerances records substances that cause you adverse reactions.
Adding an entry
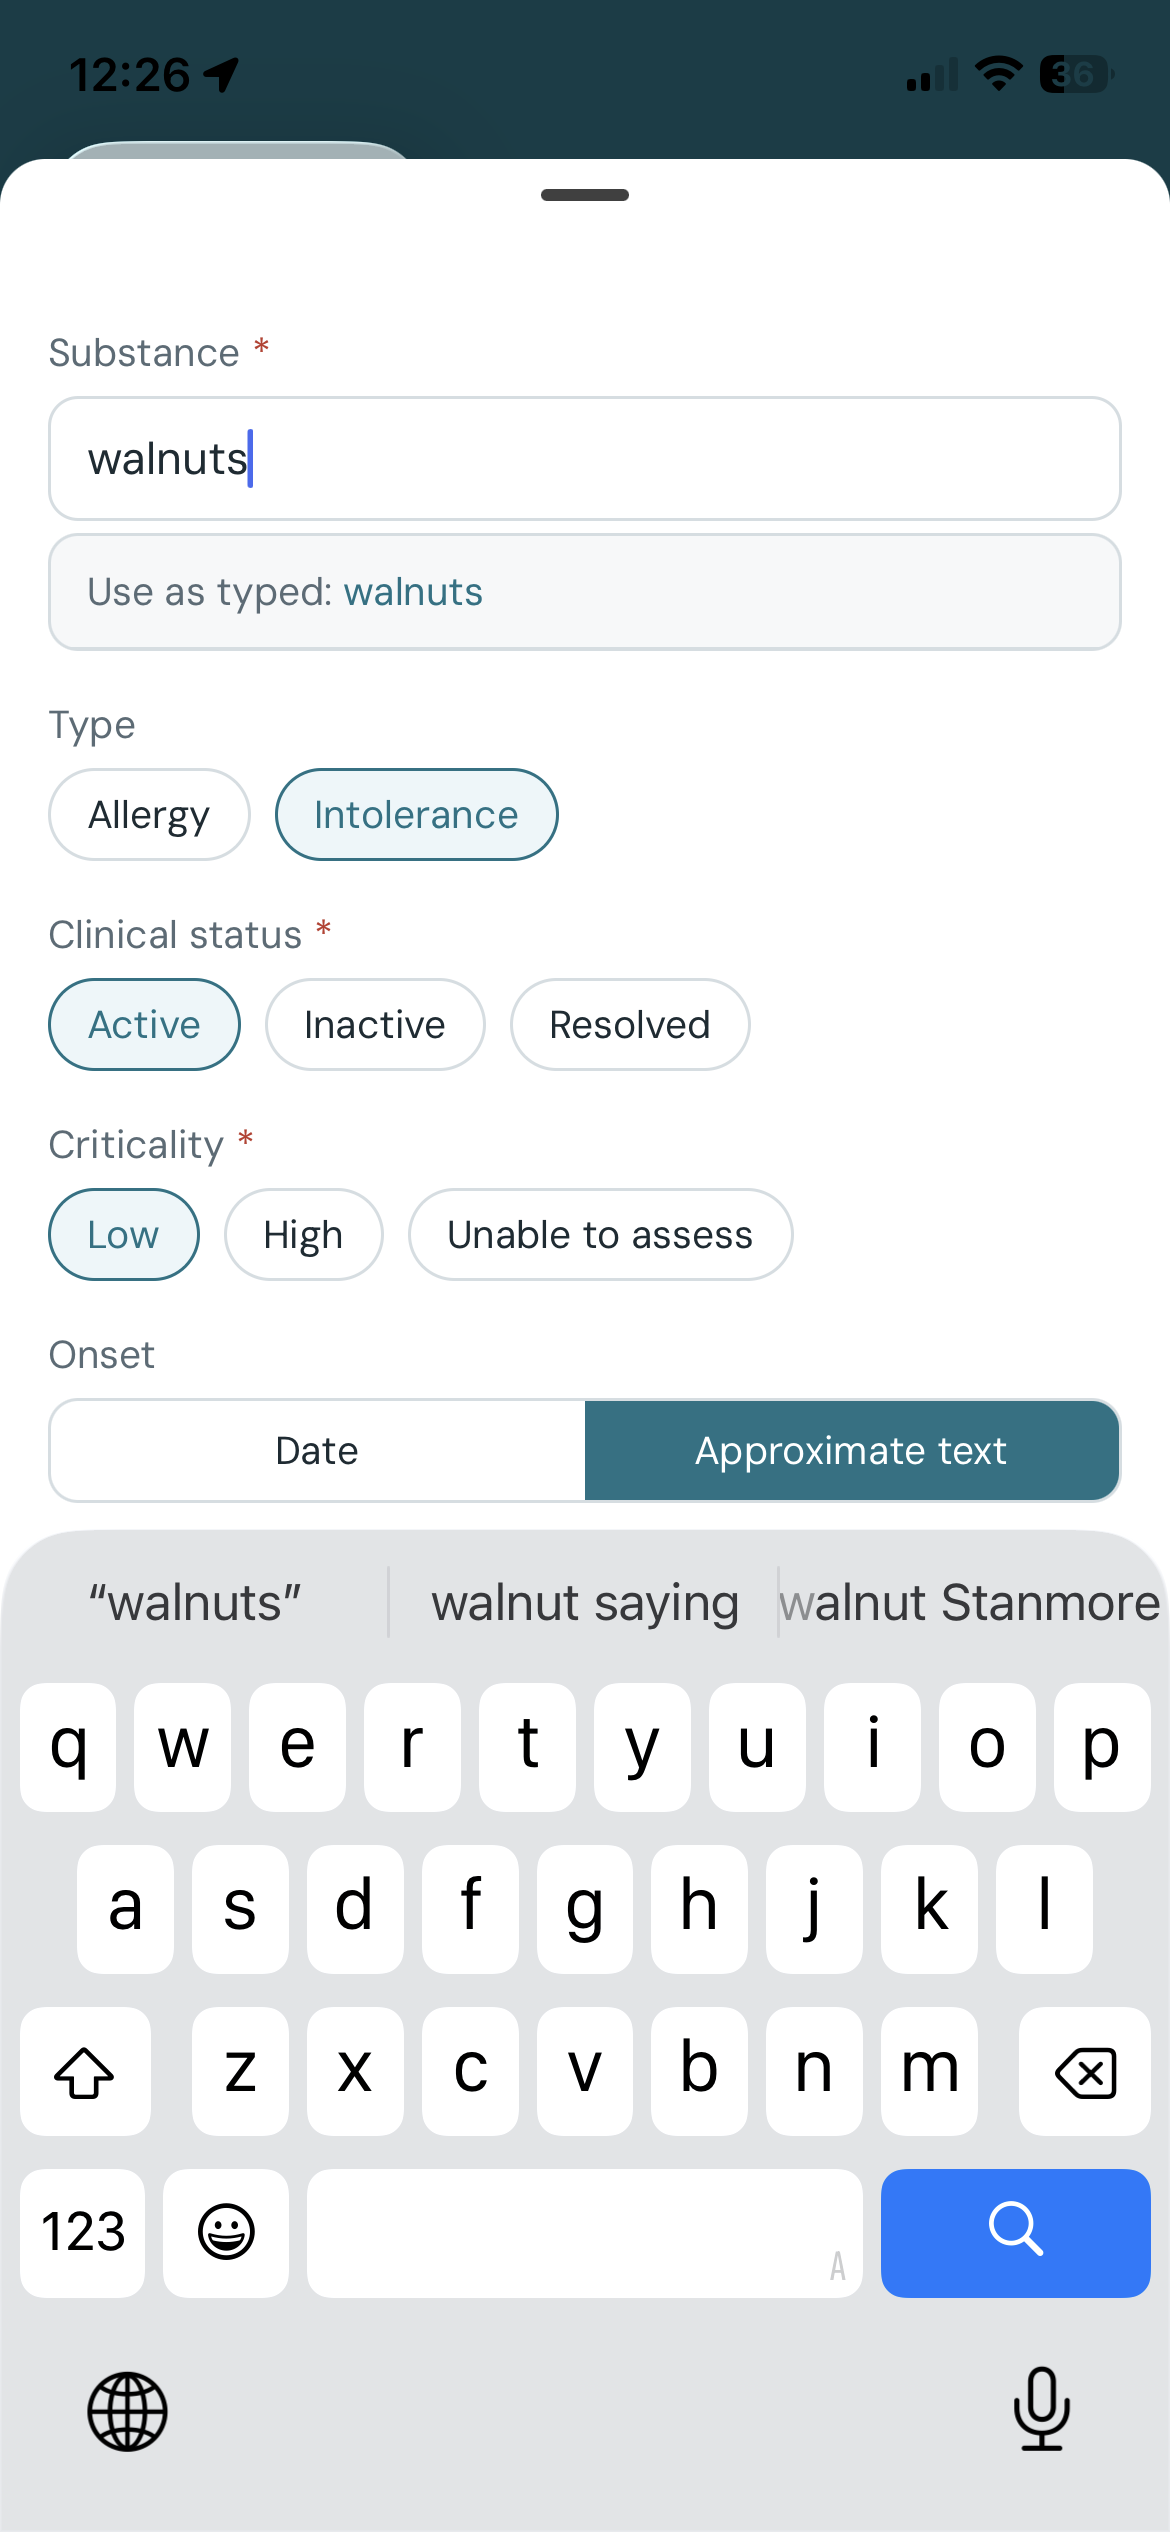
Tap the + button. A search field appears — type the substance name. If the substance is not listed, select “Use as typed”.
Field guide
- Type — the nature of the reaction:
- Allergy — an immune-mediated reaction (the immune system overreacts to the substance).
- Intolerance — a non-immune reaction (the body has difficulty processing the substance, but it is not an immune response). For example, lactose intolerance.
- Substance — the substance you react to. Search or type; use “Use as typed” for anything not in the list.
- Criticality — how dangerous this reaction could be if you were exposed again:
- Low — the reaction is unpleasant but not life-threatening.
- High — the reaction could be life-threatening (for example, anaphylaxis).
- Unable to assess — you are not sure how serious it could be.
- Reactions — the specific symptoms you experience. Tap + Add reaction to add one or more reactions. For each reaction:
- Choose a manifestation from the preset list, or type your own.
- Select severity: Mild, Moderate, or Severe.
- Optionally record the date or an approximate description (for example, “around 2018”).
📸 Screenshot — Reaction editor on iOS (
allergies-ios-reaction-editor.png). - Date — when the allergy or intolerance was first identified. Use YYYY-MM-DD; partial dates accepted.
No known allergies
If you have no known allergies or intolerances, switch on the No known allergies toggle. This tells clinicians you have actively confirmed you have none.
If you already have entries recorded, switching on the toggle will show a confirmation dialog before deleting them:
📸 Screenshot — “Clear all entries?” confirmation dialog (
no-known-warning.png).
The dialog tells you how many entries will be permanently deleted. Tap Clear all to confirm, or Cancel to keep your existing entries.
Editing an entry
Tap the entry in the list to open the edit form.
Deleting an entry
iOS: Swipe left on the entry and tap Delete, or open the edit form and tap Delete at the bottom. Android: Tap the trash icon, or open the edit form and tap Delete at the bottom.
Section note
Use the Section note field at the bottom of the screen to add free-text context about your allergies overall. This note appears in My Health Story.
4. My Health Concerns
My Health Concerns records medical conditions, diagnoses, or other health findings that are relevant to your care.
📸 Screenshot — My Health Concerns screen showing a list of conditions (
conditions-ios.png).
Adding a health concern
Tap the + button. A search field appears — type the condition name. If it is not listed, select “Use as typed”.
📸 Screenshot — Add health concern form on iOS (
conditions-ios-add-form.png).
Field guide
- Condition or finding — the name of the health concern. Search or type.
- Current status — how the condition stands today:
- Active — you currently have this condition.
- Resolved — you had it in the past but it has been fully resolved.
- Inactive — the condition exists but is not currently causing problems (in remission, managed, or dormant).
- When it started (Onset) — you can enter:
- A date in YYYY-MM-DD format (partial dates accepted).
- A plain text description, for example “since childhood” or “2019”.
No problems to list
Switch on the No problems to list toggle to actively confirm you have no health concerns to record. When you share your summary, the Health Concerns section stays visible and is marked none known. If you already have entries recorded, the app will ask you to confirm before deleting them (see No known allergies for an example of that dialog).
Editing an entry
Tap the entry to open the edit form.
Deleting an entry
iOS: Swipe left on the entry and tap Delete, or open the edit form and tap Delete at the bottom. Android: Tap the trash icon, or open the edit form and tap Delete at the bottom.
Section note
Use the Section note field at the bottom of the screen to add free-text context about your health concerns overall. This note appears in My Health Story.
5. My Immunisations
My Immunisations records vaccines you have received. Clinicians use this to see your vaccination history and avoid unnecessary repeat doses.
📸 Screenshot — My Immunisations screen showing immunisations grouped by vaccine type (
immunisations-ios.png).
How immunisations are displayed
Immunisations are grouped by vaccine type rather than shown as one long flat list. For example, every COVID-19 dose you have recorded appears together under a single COVID-19 card, and every flu shot under Influenza.
- Each group card shows the vaccine type, the date of your most recent dose, and a count of how many records it holds.
- Tap a card to expand it and see the individual doses underneath. A group with only one record shows as a plain row, not a card.
- Expanded groups show your most recent few doses; if there are more, tap Show all to reveal the rest.
- Groups are organised under broader headings (for example, Routine / childhood or Travel). Tap a heading to collapse or expand everything beneath it.
- Records where MyIPS could not work out the vaccine type appear under an Other heading with a prompt to “Tap a record to assign a vaccine type.” Open the record and pick the vaccine from the search to file it correctly.
This grouped view keeps everyday use simple (you can see at a glance that you have had a COVID shot) while still letting a specialist drill into the exact product, date, and lot number of each dose.
Adding an immunisation
Tap the + button. A search field appears — type the vaccine name to search for it. The search is scoped automatically to vaccine concepts, so typing a disease name (for example, “flu” or “covid”) will return relevant vaccine options.
If your vaccine is not listed, select “Use as typed” to save the name as you entered it.
📸 Screenshot — Add immunisation form on iOS (
immunisations-ios-add-form.png) and Android (immunisations-android-add-form.png).
Field guide
- Vaccine — the name of the vaccine. Search or type; use “Use as typed” for anything not in the list.
- Status — whether the vaccination was given:
- Completed — the vaccine was administered.
- Not done — the vaccine was intended but not given (for example, deferred).
- Date / occurrence — when you received the vaccine. You can enter:
- A date in YYYY-MM-DD format (for example,
2023-09-15). - A plain text description if you don’t know the exact date (for example, “childhood” or “2019”).
- A date in YYYY-MM-DD format (for example,
- Lot number — the batch or lot number printed on the vaccine vial or your vaccine card. This is optional but useful if you have the information.
- Dose number — which dose in a course this was (for example, “1”, “2”, “Booster”). Optional.
- Patient annotation — any free-text note you want to add about this immunisation.
No immunisations to record
If you have no immunisations to record, switch on the No immunisations to record toggle instead of leaving the list empty. This tells clinicians you have actively confirmed there is nothing to list, and the section stays visible in a shared summary marked none known. If you already have entries recorded, the app will ask you to confirm before deleting them.
Editing an entry
Tap the entry in the list to open the edit form. Make your changes; they save automatically when you leave the form.
The ⋯ actions menu
Each immunisation row has a ⋯ (more actions) button. Tapping it opens a menu with:
- Delete — remove this record.
- Mark as duplicate of… — if the same dose was recorded twice (for example, once by you and once from an import), pick which record to keep. The other is removed, and it will not reappear if you import the same file again.
- Merge with… — only offered between records of the same vaccine type. Use this to combine several records of the same dose into one. Select the records to merge, and MyIPS keeps the richest details from each (for example, the lot number from one and the exact date from another). The original records are replaced by the single merged record.
Possible duplicates within a group are flagged with a small ⚠ marker and a review note on the group card, so you can spot and reconcile them.
Merging and marking as duplicate cannot be undone, so MyIPS asks you to confirm first.
Section note
Use the Section note field at the bottom of the screen to add any free-text context about your immunisation history overall. This note appears in My Health Story.
6. My Procedures
My Procedures records operations, treatments, and other medical procedures you have had — for example a knee replacement, an appendectomy, a colonoscopy, or a cataract operation. Clinicians use this history to understand what has already been done.
📸 Screenshot — My Procedures screen showing a list of procedures (
procedures-ios.png).
Adding a procedure
Tap the + button. A search field appears — type the procedure name to search the built-in clinical database. If your procedure is not listed, select “Use as typed” to save the name exactly as you entered it.
📸 Screenshot — Add procedure form on iOS (
procedures-ios-add-form.png).
Field guide
- Procedure — the name of the procedure (required). Search or type your own name.
- Date performed — when the procedure was carried out. You can enter:
- A date in YYYY-MM-DD format (for example,
2021-06-14). Partial dates (YYYY or YYYY-MM) are accepted. - A plain text description if you don’t know the exact date (for example, “childhood” or “around 2015”).
- A date in YYYY-MM-DD format (for example,
- Patient annotation — (optional) any free-text note you want to add about this procedure, such as the hospital, the surgeon, or the outcome.
You don’t record a status for a procedure — everything you list here is treated as something that was carried out.
No procedures to list
If you have no procedures to record, switch on the No procedures to list toggle instead of leaving the list empty. This tells clinicians you have actively confirmed there is nothing to list, and the section stays visible in a shared summary marked none known. If you already have entries recorded, the app will ask you to confirm before deleting them.
Editing an entry
Tap the entry in the list to open the edit form. Make your changes; they save automatically when you leave the form.
Deleting or de-duplicating an entry
Each procedure row has a ⋯ (more actions) button. Tapping it opens a menu with:
- Delete — remove this record.
- Mark as duplicate of… — if the same procedure was recorded twice (for example, once by you and once from an import), pick which record to keep. The other is removed and will not reappear if you import the same file again.
Marking as duplicate cannot be undone, so MyIPS asks you to confirm first.
Section note
Use the Section note field at the bottom of the screen to add free-text context about your procedure history overall. This note appears in My Health Story.
7. My Pregnancy
My Pregnancy records your current pregnancy status and, if you are pregnant, your estimated due date. Clinicians treat pregnancy as important safety information — it affects which medicines, tests, and imaging are appropriate.
This section is different from the others. It stays closed until you tell the app it applies to you, and there is no list to fill in — just a short set of questions.
📸 Screenshot — My Pregnancy screen on iOS (
pregnancy-ios.png).
“Does this section apply to you?”
When you open My Pregnancy, the first and only thing you see is a single question: Does this section apply to you? Nothing else is shown until you answer Yes.
- The app never decides this for you. Whether the section applies is your choice — it is never assumed from your age, your sex, or anything else in your record.
- Leaving it switched off means the section simply does not apply to you. In a shared summary the History of Pregnancy section is marked not applicable and records no pregnancy status, due date, or other details.
“Doesn’t apply” is not the same as “Not pregnant.” Switching the section off makes no clinical statement — it does not record that you are not pregnant. If you want to positively record that you are not pregnant, switch the section on and choose the Not pregnant status (see below). These are two different things, and the app keeps them separate on purpose.
Switching the section on
Set Does this section apply to you? to Yes, and the questions below appear. Your answer is saved straight away.
If you later switch the section back off while you have details entered, the app asks you to confirm first, because turning it off deletes the pregnancy details you entered. Confirm to clear them, or cancel to keep them.
Current pregnancy status
Choose one:
- Pregnant — you are currently pregnant.
- Not pregnant — you are positively recording that you are not pregnant.
- Unknown — you are not sure.
Estimated delivery date (due date)
This question appears only when you choose Pregnant. You have two ways to answer:
- Enter a date — your estimated due date, in YYYY-MM-DD format.
- “I don’t know” — choose this if you don’t know your due date. The app records that the date is unknown, rather than leaving the question blank.
The app does not work out a due date for you from any other field — it only records what you enter. If you leave the due date untouched, nothing about it is recorded.
Last menstrual period
Below the status, the app shows one optional question: If you menstruate, when did your last period start? Enter the start date of your last period in YYYY-MM-DD format. This field is always optional — leave it blank if you prefer not to say, and nothing about it is recorded. It appears regardless of which status you chose.
Saving
As with the rest of the app, there is no Save button — your answers save automatically as you make them.
A note on sensitivity
Pregnancy information is personal. Like everything else in MyIPS, it is stored only on your device, and pregnancy details are included in a shared summary only if this section applies to you and you choose to share. If the section doesn’t apply to you, the shared summary simply marks it not applicable and carries no pregnancy details or clinical statement.
Section note
Use the Section note field at the bottom of the screen to add any free-text context about your pregnancy overall. This note appears in My Health Story.
8. My Lab Results
My Lab Results records blood tests, urine tests, and other laboratory findings.
📸 Screenshot — My Lab Results screen showing a list of results (
lab-results-ios.png).
Adding a lab result
Tap the + button. A search field appears — type the test name to search the built-in database of laboratory tests. If your test is not listed, select “Use as typed” to save the name as you entered it.
📸 Screenshot — Add lab result form on iOS (
lab-results-ios-add-form.png) and Android (lab-results-android-add-form.png).
Field guide
- Test name — the name of the test (for example, “Glucose” or “Haemoglobin”). Search or type your own name.
- Date — when the test was performed, in YYYY-MM-DD format.
- Value type — choose how the result is expressed:
- Number — a numeric result with a unit (for example, 5.4 mmol/L). After selecting Number, enter the value and unit separately, and optionally a reference range (low and high).
- Text — a text result (for example, “Positive” or “Normal”).
- Value — the result itself. For numeric results, enter the number. For text results, type the value.
- Unit — (numeric results only) the measurement unit (for example, mmol/L, g/dL).
- Reference range — (numeric results, optional) the normal low and high values from the lab report. Enter both or just one.
- Interpretation — (optional) flag the result: Normal, High, Low, or Abnormal.
- Lab name — (optional) the name of the laboratory that performed the test.
- Status — the result’s reporting status:
- Final — the result is complete and verified.
- Preliminary — a provisional result that may change.
- Amended — a correction to a previously issued result.
- Corrected — an error in a previous result has been corrected.
- Note — (optional) any free-text note you want to add about this result.
Tips for finding the right test in the search
Lab test names in the search come from a clinical database, so results can look more technical than the name printed on your lab report. Here is how to get to the right entry without getting stuck.
Type the name exactly as it appears on your report. Your lab report is the best starting point. If it says “HbA1c”, type that. If it says “eGFR”, type that. Many common abbreviations match directly.
Ignore everything in brackets. Results often include scientific detail in square brackets — for example, “Glucose [Mass/volume] in Serum or Plasma”. That bracketed part just describes how the lab measured the test. Look at the word before the first bracket to identify the test, and pick whichever entry matches.
If you see several similar options, any of them is fine. The most important part of a lab result is the number and the unit you record — not which exact variant of the test name you pick. If you see three entries that all say “Glucose” with slightly different descriptions, choose any one that looks right.
Common abbreviations that work well:
| What you might type | What it finds |
|---|---|
HbA1c or glycated |
Glycated haemoglobin (blood sugar average) |
TSH |
Thyroid stimulating hormone |
eGFR or creatinine |
Kidney function tests |
LDL or HDL |
Cholesterol fractions |
PSA |
Prostate-specific antigen |
INR or prothrombin |
Clotting / warfarin monitoring |
haemoglobin or hemoglobin |
Full blood count |
When in doubt, use “Use as typed” — and don’t feel bad about it. This is more of a rule than a fallback for lab results. If you spend more than a minute searching and nothing looks right, tap “Use as typed” and move on. The value, unit, and date you record are what a clinician needs.
No significant results
If you have no lab results to record, switch on the No significant results toggle instead of leaving the list empty. This tells clinicians you have actively confirmed there is nothing to list, and the section stays visible in a shared summary marked none known. If you already have entries recorded, the app will ask you to confirm before deleting them. If you leave the section empty without switching this on, it appears in a shared summary marked not started instead.
Editing an entry
Tap the entry in the list to open the edit form. Make your changes; they save automatically when you leave the form.
Deleting an entry
iOS: Swipe left on the entry and tap Delete, or open the edit form and tap Delete at the bottom. Android: Tap the trash icon next to the entry, or open the edit form and tap Delete at the bottom.
Section note
Use the Section note field at the bottom of the screen to add free-text context about your lab results overall. This note appears in My Health Story.
9. My Imaging Results
My Imaging Results records X-rays, CT scans, MRI scans, ultrasounds, and other medical imaging studies you have had.
📸 Screenshot — My Imaging Results screen showing a list of studies (
imaging-ios.png).
Adding an imaging study
Tap the + button. You can find a study type using the step-by-step picker, or enter it manually:
Using the picker:
- Modality — tap the type of imaging (for example, CT, MRI, X-ray, Ultrasound).
- Body region — type a body part to filter the list (for example, “chest” or “knee”), then tap the matching region.
- Study type — tap the specific study from the list that appears.
If your study is not in the list, tap Enter manually to type a description instead.
📸 Screenshot — Add imaging form showing the modality picker on iOS (
imaging-ios-add-form.png) and Android (imaging-android-add-form.png).
Field guide
- Study type — the name of the imaging study (required). Use the picker or enter manually.
- Date — when the study was performed, in YYYY-MM-DD format (required). Partial dates (YYYY or YYYY-MM) are accepted.
- Facility — (optional) the name of the imaging centre or hospital where the study was done.
- Findings / Impression — (optional) any findings or summary from the report. You can copy a sentence or two from your radiology report here.
- Status — the reporting status of the result:
- Final — the report is complete.
- Preliminary — a provisional report that may be updated.
- Amended — the report has been revised after initial release.
No significant results
If you have no imaging results to record, switch on the No significant results toggle instead of leaving the list empty. This tells clinicians you have actively confirmed there is nothing to list, and the section stays visible in a shared summary marked none known. If you already have entries recorded, the app will ask you to confirm before deleting them. If you leave the section empty without switching this on, it appears in a shared summary marked not started instead.
Editing an entry
Tap the entry in the list to open the edit form. Make your changes; they save automatically when you leave the form.
Deleting an entry
iOS: Swipe left on the entry and tap Delete, or open the edit form and tap Done after making changes. Android: Tap the trash icon next to the entry, or open the edit form.
10. My Vital Signs
My Vital Signs records physical measurements such as blood pressure, heart rate, weight, height, BMI, oxygen saturation, respiratory rate, and pain severity. Unlike the other sections, each vital type can have multiple dated readings — so you can build up a history over time rather than recording just a single value.
📸 Screenshot — My Vital Signs screen on iOS (
vital-signs-ios.png).
The section screen
The screen shows a row for each of the eight supported vital types. Each row displays:
- The vital type name on the left.
- The number of readings you have recorded for that type on the right, in the app’s accent colour. If you have no readings for a type yet, a dash (—) appears instead, and the row is not tappable.
Two buttons appear at the top right:
- Latest Values — opens a sheet listing the single most recent reading for each vital type. Types with no readings show a dash.
- + Add Readings — opens a form to record one or more readings at once.
Adding readings
Tap + Add Readings to open the Add Readings form. All eight vital types are shown in a single form.
Date (required) — defaults to today. You can change it if the readings are from a different day. Enter in YYYY-MM-DD format.
Vital type fields:
| Vital type | How to enter |
|---|---|
| Blood Pressure | Two separate fields: Systolic (top number) and Diastolic (bottom number), both in mmHg |
| Heart Rate | Beats per minute |
| Body Weight | Kilograms |
| Body Height | Centimetres |
| BMI | Calculated automatically from weight and height if you fill both in; shown in a muted style. You can also enter a BMI directly if you know it without entering weight and height separately |
| Oxygen Saturation | Percentage (%) |
| Respiratory Rate | Breaths per minute |
| Pain Severity | A number from 0 (no pain) to 10 (worst imaginable pain) |
You do not need to fill in every type. Tap Done to save one reading for each type you completed. If you tap Done with nothing filled in, nothing is saved.
Viewing the latest values
Tap Latest Values to see a snapshot of the most recent reading for each vital type side by side. This is a read-only view — use it to get a quick overview before a medical appointment.
Viewing history for a type
Tap any row that has a reading count to open the history sheet for that vital type. Readings are shown in reverse date order (most recent first). Each row shows the date and the recorded value.
Editing a reading
In the history sheet, tap any reading to open it in edit mode. Only the fields for that vital type are shown, pre-filled with the existing date and value. Make your changes and tap Done to save.
Deleting a reading
In the history sheet, swipe left on a reading to reveal the Delete button. Tap it, then confirm in the alert that appears. Deletion cannot be undone.
If you delete the last reading for a type, the history sheet closes automatically.
11. My Medical Devices
My Medical Devices records implanted or in-use medical devices — such as a pacemaker, insulin pump, cochlear implant, hearing aid, or blood glucose meter. In an emergency, or when seeing a clinician who doesn’t have your history, knowing exactly which devices you carry (and their make and model) can matter a great deal.
📸 Screenshot — My Medical Devices screen on iOS (
medical-devices-ios.png).
Adding a device
Tap the + button in the section heading row to open the device form, then fill in what you know:
| Field | What to enter |
|---|---|
| Device type | What kind of device it is (for example, “Cardiac pacemaker”). Start typing to search a list of standard device types, or just type your own words. |
| Device name | The product name if you know it — for example, “Medtronic Micra”. |
| Manufacturer | Who makes it — for example, “Medtronic”. |
| Model number | The model or product number, if you have it. |
| In use since | When the device was fitted or you started using it. Choose Enter a date and type a date (YYYY-MM-DD), or choose I don’t know if you’re not sure. |
| Still in use | Yes if you currently have or use the device; No longer in use if it has been removed or replaced. |
| Patient annotation | An optional personal note about the device. |
You only need a device type or a name to save — everything else is optional. Tap Save when you’re done.
The technical identifiers a device carries — its UDI (Unique Device Identifier), serial number, and firmware version — are not part of the entry form. These are detailed manufacturing fields that you would rarely have to hand; they are preserved when a device arrives through Import (see below) and shown there in full.
No known medical devices
If you have no medical devices, turn on the No known medical devices toggle at the top of the section. This records, in your shared summary, that the absence is intentional rather than something you forgot to fill in. Turning it on while you have devices listed will ask you to confirm before clearing them.
Editing or deleting a device
Tap a device you added to reopen the form and make changes. To remove one, use the ⋯ menu on its row and choose Delete.
Imported devices
When you import a health summary that contains devices, each one appears here as a read-only record. Tapping an imported device opens a detail view showing everything the source provided: type, names, manufacturer, model, serial and lot numbers, and the UDI. An expandable Full details section reveals the deeper technical fields — manufacture and expiry dates, the UDI device identifier, firmware/version entries, and any device specialization. Imported devices can’t be edited, but you can add your own note or delete them.
12. My Care Team
My Care Team is your personal directory of the providers and organisations involved in your care — your GP, specialists, clinics, and hospitals. It travels with your health summary so a new clinician can see who else looks after you.
The screen has two tabs:
- Providers — individual people (doctors, nurses, specialists).
- Organisations — clinics, practices, hospitals, and other facilities.
Adding a provider or organisation
Tap + Add provider or + Add organisation and fill in the details:
- Name (required).
- Specialty / role (providers) or Type (organisations) — free text, e.g. General Practice.
- Phone, Email, Address — optional contact details.
- Identifier (optional) — a system and value pair, such as a national provider number (NPI) or an organisation identifier. You don’t need this, but adding a known identifier helps MyIPS recognise the same provider or organisation when you import records later, so you don’t end up with duplicates.
A provider’s form includes an organisation selector, and an organisation’s form includes a provider selector. Pick an existing entry or choose Add new… to create and link one in the same step.
Linking providers to organisations
A provider can work at one or more organisations, and an organisation can have many providers. These links are shown on each detail view: a provider’s detail lists Works at, and an organisation’s detail lists Providers here. Tap a linked entry to jump to it.
From a link’s ⋯ menu you can:
- No longer works here — removes just the link, keeping both the provider and the organisation.
- Delete [name] — removes that provider or organisation entirely (and all of its links). The confirmation tells you which linked entries will be affected.
Marking your GP
Open a provider or organisation and tap Make this my GP. If you already have a GP marked, MyIPS asks whether to add alongside the existing one or replace all of them. Your GP shows a GP badge and is exported as your Patient.generalPractitioner in the shared summary.
How import fills in your care team
When you import a health summary, MyIPS reads the providers and organisations that performed your care — the Practitioner, PractitionerRole, and Organization resources referenced by your imported records — and adds them here automatically. If the imported summary names a GP, that provider (or organisation) is added and marked as your GP. Importing adds to your existing GP marks rather than overwriting them, so a mark you set yourself is never silently removed.
Imported providers and organisations are locked (read-only), like imported records elsewhere in the app. You can delete them, but not edit them.
Duplicates. MyIPS only recognises an imported provider or organisation as “the same” one when it carries a matching identifier. Entries without identifiers — common in everyday exports — may appear more than once after repeated imports. You can delete any duplicates you don’t want.
A note on sharing. My Care Team is additional, non-standard content in the IPS bundle (a “Patient care team” section). IPS-compliant apps that receive your summary will read your GP from
Patient.generalPractitioner, but they may not display the full care team list.
13. My Health Story
My Health Story brings together a narrative view of your health. It has two parts.
📸 Screenshot — My Health Story screen on iOS (
health-story-ios.png).
Part 1 — Section notes
The top of My Health Story shows the section notes you wrote on the Medications, Allergies, Health Concerns, Immunisations, Procedures, and Lab Results screens. These are displayed read-only here; to edit them, go back to the relevant section screen.
If you have not written any section notes, this area shows “No section notes yet”.
Include section notes in export — this toggle controls whether your section notes are included when you share your health summary. Switch it on (the default) to include them; switch it off if you want to share a summary without your personal narrative notes.
Part 2 — In my own words
The In my own words field is a free-text area where you can write anything that matters to you but does not fit neatly in the structured sections above. Examples:
- A brief history of a complex condition
- Things that have worked or not worked in past treatments
- A note for emergency responders
- Anything you want a clinician to know before they speak to you
Changes save automatically when you move focus away from the field.
Nothing to add here
If you have nothing to write in your own words, switch on the Nothing to add here toggle. This actively confirms you have considered the section and have nothing to add, rather than simply not having filled it in yet — in a shared summary the Health Story section stays visible and is marked none known. If you already have text written, the app asks you to confirm before clearing it. Switching the toggle off (or starting to type again) returns the section to its normal editable state.
Imported stories appear here too. If you import a health summary that contains a Patient Story, MyIPS adds its text to this field below whatever you have already written, under a dated heading showing where it came from. Your own words are never overwritten. See Section 15 for details.
14. Sharing your health summary
Tap the Share button on the Summary screen to open the Share screen.
📸 Screenshot — Share screen on iOS (
share-ios.png) and Android (share-android.png).
Before you can share
Three sections must be completed before you can share a summary: My Medications, My Allergies / Intolerances, and My Health Concerns. For each one, either add your entries or switch on its “no known…” toggle to confirm there is nothing to record. If any of the three is still untouched, MyIPS will tell you which sections need attention and will not share until you have filled them in or marked them as none known.
Every other section is optional. If you leave an optional section empty, it still appears in a shared summary marked not started — this tells a clinician you have not yet filled it in (rather than the section being hidden entirely, as in earlier versions). To show that you have actively confirmed a section is empty, use its “no known…” toggle so it reads none known instead.
Choosing a format
The top of the Share screen shows three format tiles. Tap a tile to select it — FHIR JSON is selected by default.
FHIR JSON
A data file in a standard healthcare format. Use this when:
- Sending to a health app or clinical system that can read standard health data files.
- Keeping a structured backup of your data.
- Sharing with a technical recipient such as a hospital IT team.
Most general users will use PDF. The data file is intended for technical recipients or health apps that can import it.
A note on incomplete data: A data file has to be valid for a clinical system to read it. If an entry has a value that isn’t quite right — for example, an impossible date like
2024-02-31— MyIPS leaves that value out of the shared file and tells you what was changed. The information stored on your device is never modified.
A formatted document containing all the information in your health summary. Use this when:
- Sharing with a doctor, specialist, or pharmacist who needs a readable document.
- Printing a copy to keep in your wallet or give to a family member.
- Sending to a clinic by email.
The PDF includes your details, medications, allergies, health concerns, immunisations, procedures, lab results, imaging results, vital signs, and health story (section notes are included or excluded based on the Include section notes in export toggle in My Health Story).
iOS / Android: The share options look different on iOS and Android but work the same way. On both platforms you can send the file via email, messaging apps, or save it to your files.
QR Code
Coming soon. Tapping this tile shows a “Coming soon” notice; it cannot be selected as the active format.
Options
Tap the Options header to expand the options panel. The panel is collapsed by default.
Validate against IPS 2.0 (on by default)
Before generating your file, MyIPS checks that your data meets the requirements of the IPS 2.0 international standard.
- For FHIR JSON: if an entry has a problem — for example an impossible date — that value is left out of the file and you are told what was changed. If the overall check fails, MyIPS tells you what needs fixing and will not share until you address it (or delete the problematic entry).
- For PDF: if the check finds issues, a notice appears letting you choose to share anyway or go back and fix the problems first. The PDF is a human-readable document and renders whatever you have entered.
When Validate is switched off, a warning appears near the Share button. The file is generated from whatever you have entered without any conformance check.
Active / recent only (on by default)
Include only records that are currently active or recent. Older, resolved, or stopped entries are omitted. Switch this off to include your complete history. This applies to both FHIR JSON and PDF exports.
Include provenance (off by default — FHIR JSON only)
Add a complete audit trail to the exported FHIR JSON file, recording every change made to your data, when it was made, and on which device.
- Who it’s for: Technical users and health professionals who need a complete, traceable record rather than just the current state of your data.
- What it contains: Everything in the standard FHIR JSON export, plus a detailed history of every change.
This option is greyed out and unavailable when PDF is selected.
Sharing
Tap the Share button to generate your summary.
Before the share sheet opens, a confirmation notice appears — tap Share to proceed or Cancel to return to the options screen.
While the file is being prepared, the Share button shows a loading indicator and cannot be tapped again. Once the share sheet opens, you can send the file via email, messaging apps, or save it to your files.
15. Importing health data
Tap the Import button on the Summary screen to open the Import screen.
📸 Screenshot — Import screen on iOS (
import-ios.png) and Android (import-android.png).
Import from a file
If you have a health summary saved as a file from MyIPS or another health app, you can import it:
- Tap Import from file on the Import screen.
- Select the JSON file from your device’s file picker.
- MyIPS reads the file and shows you a confirmation screen with the patient details it found.
- Confirm the import to merge the records with your existing data.
Duplicate handling — if an imported record matches something you have already recorded, MyIPS resolves the conflict automatically. Locally created records take priority over imported ones; if you delete an imported record and re-import the same file, the deleted record will not reappear.
Imported records are read-only — records that came from an import are marked with their source. They appear in your exported summary, but their clinical details cannot be edited, because they came from a health system rather than from you. Tapping an imported record opens a read-only detail view laid out for the kind of record it is — a condition, medicine, allergy, immunisation, procedure, lab result, or imaging result each show the details that matter most for that type, presented for easy reading rather than as a raw list of fields. Your own note (added under Your note) is shown here too, along with a View source link (where the data came from and when). For lab results and imaging results, an expandable Full details section reveals the technical medical codes (such as LOINC or SNOMED) behind the record — tap it open if you want to see them, or leave it closed. From the ⋯ menu on an imported record you can:
- Add note — attach your own personal note to the record (for example, “ask my cardiologist about this”). Your note is saved with the record and does not change the imported clinical data.
- Delete — remove the record.
There is no “unlock to edit” — to correct a clinical detail on an imported record, delete it and add your own entry manually.
What gets imported
All standard sections are supported: My Details, My Medications, My Allergies / Intolerances, My Health Concerns, My Immunisations, My Procedures, My Lab Results, My Imaging Results, and My Vital Signs.
Note on resolved health concerns: Health concerns that are marked resolved or inactive in an imported file are only carried over if they resolved recently (within the past year). Concerns that resolved more than a year ago are not imported, because the summary is designed to reflect your current health picture rather than your full medical history. Concerns whose resolution date is not recorded are always imported, since MyIPS cannot confirm when they ended. Active concerns are always imported. Concerns that the source system marked as refuted (a mistaken entry) or entered in error are never imported. If you want to keep a historical concern in your summary, add it manually in My Health Concerns.
Note on pregnancy information: Pregnancy details are not imported from health data files. Whether the My Pregnancy section applies is always your choice and is never assumed — so any pregnancy status, due date, or last-menstrual-period date contained in an imported file is skipped. Enter pregnancy information yourself in the My Pregnancy section (see Section 7 for details).
Note on imported values: MyIPS checks imported records as they come in. If a field doesn’t look right (for example, a malformed date), the record is flagged with a small ⚠ marker so you can review it, rather than being silently trusted. Open the record to check and correct it.
Note on medication records: Health data files can represent medications in several different ways depending on where they came from — a prescription system might use a “medication request”, a pharmacy a “medication dispense”, and a hospital record a “medication administration”. MyIPS automatically converts all of these into a standard medication entry when importing, so they appear alongside any medications you have entered manually. If a converted entry came from a record that was marked as “completed” in the source system, a note will appear in the medication editor to flag this, since a completed prescription does not necessarily mean you have stopped taking the medication. You can review and update the status as needed.
Note on your Patient Story (“In my own words”): Some health summaries include a Patient Story — the patient’s own free-text account of their goals, preferences, and priorities for care. When an imported file contains one, MyIPS now carries that text over into your In my own words field (see Section 11) instead of dropping it, so you don’t have to re-type it.
- The imported text is added, never overwritten. It is appended below anything you have already written, under a heading that records where it came from and the date — for example,
Imported from My Clinic on 6 Jun 2026:(the date is shown in your device’s regional format, so the exact style may differ). Your existing words always stay exactly as you left them.- If you import more than one file, each contributes its own dated, labelled block. MyIPS does not try to remove repeats, so if you import the same story twice you will see two blocks — you can delete either one by editing the In my own words field.
- Slightly technical: MyIPS recognises a Patient Story by the standard international code for it (LOINC
81338-6). Files from other standards-conformant systems that use this code will have their story imported; a file you exported from MyIPS itself will not re-import its story yet, because MyIPS currently exports the story under a different (older) code. Aligning the two is planned for a future update.
Import via QR code or link (SMART Health Link)
Many hospitals, clinics, and patient portals can generate a QR code or secure link that carries your health data. MyIPS can scan these to import your records directly.
To import via QR code:
- Tap Scan QR / Paste Link on the Import screen.
- Point your camera at the QR code displayed by your provider or portal.
- MyIPS detects the data automatically and begins the import.
📸 Screenshot — QR scanner on iOS (
import-qr-ios.png).
To import via a link received by email or message:
- Tap Scan QR / Paste Link.
- Paste the link into the “Or paste a link” field.
- Tap Import.
Passcode-protected links:
Some links are protected by a passcode set by your provider. If prompted:
- Enter the passcode you received (usually provided alongside the QR code or link).
- Tap Import.
- If the passcode is wrong, you will see how many attempts remain. After too many failed attempts the link is locked and you will need to contact your provider for a new one.
📸 Screenshot — Passcode entry on iOS (
import-passcode-ios.png).
Past imports
Tap Import History on the Import screen to see a record of your previous imports. Import History is also accessible from Advanced Features (the gear icon on the Summary screen). See Import History below for what it shows and how to use it.
16. Advanced Features
Tap the gear icon (⚙) in the top right of the Summary screen to open Advanced Features.
📸 Screenshot — Advanced Features screen on iOS (
advanced-ios.png).
Import History
Import History shows a reverse-chronological list of every file or QR code you have imported. Each row shows the source name, the date and time of the import, the number of records written, and — if any records were skipped — the number skipped.
Tap any row to open the receipt detail for that import. The receipt shows:
- Source and date — where the data came from and when it was imported.
- Bundle info — the bundle identifier, type, and any FHIR profiles it claimed (for example,
hl7.fhir.uv.ips|2.0.0). - Written — the number of records added to each section (medications, allergies, conditions, and so on).
- Skipped — each resource that was not imported, with its resource type, the identifier it carried in the source file, and the reason it was skipped (for example, “Condition marked refuted” or “Observation not a lab result”).
No receipt available. Imports that were done before this feature was added show a “No receipt available” notice in place of the detail view.
To share the receipt as a PDF:
- Tap Share on the receipt detail screen.
- Confirm the share when prompted.
- MyIPS generates a PDF named
import-receipt-YYYY-MM-DD.pdfand opens the native share sheet.
To print the receipt:
Tap Print on the receipt detail screen. The native print dialog opens immediately — no confirmation step.
Display Language
Change the language the app uses for labels and interface text. Tap Display Language, then select a language from the list. Changes take effect immediately without restarting the app.
Load Sample Data
Loads a set of example health records so you can explore what a completed summary looks like. Choose from a list of testing presets.
Warning: Loading sample data replaces all your existing health records. Only use this if you want to explore the app with example data.
Clear All Data
Permanently deletes all your health data and the complete history of changes from your device.
Warning: This cannot be undone. If you want to keep a backup before clearing, use Share as JSON to save a copy to your files first.
17. Privacy & Security
What’s stored and where
All data you enter in MyIPS is stored only on your device. There is no MyIPS account, no cloud sync, and no server that receives your information. The only way data leaves your device is if you explicitly share it using the Share button.
Encryption
Your health data is stored in an encrypted database on your device. The encryption means the data cannot be read by other apps or by anyone who accesses your device’s storage without the encryption key.
Removing your data
To remove all your data from MyIPS, delete the app. This permanently removes the encrypted database and all its contents from your device. There is no recovery option — deleted data cannot be restored.
If you want to keep a backup before deleting, use Share as JSON to save a copy to your files first.
Appendix: Standards and terminology
Why standards matter
When you record your health information, the value of that record depends on how well it can be understood — not just by you today, but by a clinician you’ve never met, in a system you haven’t heard of, possibly years from now.
Without standards, health data quickly becomes a silo. A file exported from one app may be unreadable by another. A test named “Kidney function” in one system may mean something slightly different in another. A medication recorded as a brand name may not be recognised once that brand is withdrawn from the market.
MyIPS addresses this by grounding everything in internationally adopted standards. When you pick a medication name from the search rather than typing it freely, or when you select a specific test from the lab results list, you are attaching a code from one of these standards — a code that has a precise, agreed meaning that clinical systems worldwide can act on. Your records become interoperable: they can move between apps, cross borders, and survive the passage of time.
You don’t need to know any of this to use MyIPS. But if you want to understand what’s underneath, here is a brief description of each standard the app relies on.
HL7 FHIR R4
What it is: FHIR (Fast Healthcare Interoperability Resources), published by HL7 International, is the dominant global standard for representing and exchanging health data digitally. Version R4 (Release 4) is the edition most widely adopted in clinical systems today.
What it does: FHIR defines a set of building blocks called resources — one for a patient, one for a medication, one for an observation, and so on — and specifies exactly how each should be structured so that any FHIR-capable system can read it. A FHIR file is essentially a bundle of these resources packaged together.
Where MyIPS uses it: Every data file that MyIPS exports (via the Share screen, in FHIR JSON format) is a valid FHIR R4 document. Imported files are also expected to be FHIR R4 bundles.
Learn more: hl7.org/fhir/R4
International Patient Summary (IPS)
What it is: The International Patient Summary is a specification published jointly by HL7 International and ISO that defines what a portable health summary should contain and how it should be structured. MyIPS follows version 2.0.0 of the IPS standard.
What it does: IPS takes FHIR R4 as its foundation and adds a layer of requirements specific to patient summaries — which sections must be present, which coding systems to use for each section, and how to represent the absence of information (for example, “no known allergies”). This means an IPS document produced in New Zealand can be correctly interpreted by an emergency system in France or a clinical app in Japan.
Where MyIPS uses it: The shape of your exported summary — the sections it contains, the order they appear in, the coded values used — all conform to the IPS 2.0.0 profile.
Learn more: hl7.org/fhir/uv/ips
SNOMED CT
What it is: SNOMED CT (Systematized Nomenclature of Medicine — Clinical Terms) is the world’s most comprehensive clinical terminology system, maintained by SNOMED International. It contains hundreds of thousands of precisely defined medical concepts covering conditions, procedures, medications, body structures, and more.
What it does: Every SNOMED concept has a unique numeric code with a rigorously defined meaning. “Penicillin allergy” is not just a phrase — it is concept 372687004, with formal relationships to the drug, the reaction type, and the immune mechanism. This precision is what allows clinical systems to make reliable decisions based on your records.
Where MyIPS uses it: The search in My Medications (medication names and routes), My Allergies / Intolerances, My Health Concerns, My Immunisations, and My Procedures all draw from a bundled subset of SNOMED CT selected specifically for patient summaries. When you pick a result from the search, you are selecting a SNOMED concept.
Learn more: snomed.org
LOINC
What it is: LOINC (Logical Observation Identifiers Names and Codes) is a universal system for naming laboratory tests, clinical measurements, and medical reports. It is maintained by the Regenstrief Institute and used in health systems across more than 170 countries.
What it does: LOINC solves a specific problem: the same test can have dozens of different names across different labs and countries. “Haemoglobin A1c”, “HbA1c”, “Glycated haemoglobin”, and “Glycosylated haemoglobin 2” all describe the same measurement. LOINC gives each distinct test a single code (in this case, 4548-4) so that two systems can recognise they are talking about the same thing regardless of what name each of them uses locally.
Where MyIPS uses it: The test name search in My Lab Results draws from LOINC. The Imaging section uses LOINC codes to identify radiology studies (for example, a chest X-ray vs a chest CT). My Vital Signs uses LOINC codes to identify each measurement type (for example, 8867-4 for heart rate and 85354-9 for blood pressure). The section codes used to identify each part of your exported summary (medications section, results section, vital signs section, and so on) are also LOINC codes.
Learn more: loinc.org
UCUM
What it is: UCUM (Unified Code for Units of Measure) is a standard for expressing measurement units in a way that computers can unambiguously interpret. It is maintained by the Regenstrief Institute alongside LOINC.
What it does: In everyday language, unit abbreviations are inconsistent — “L” can mean litres or something else depending on context, and “U” for units is easily confused with a zero in handwriting. UCUM defines a single, case-sensitive code for every scientific unit (for example, mmol/L, g/dL, 10*9/L) so that a numeric result and its unit always travel together without ambiguity.
Where MyIPS uses it: When you record a numeric lab result and enter a unit, that unit is expressed using UCUM in the exported data file.
Learn more: ucum.org
SMART Health Links
What it is: SMART Health Links is an open standard, developed by the SMART Health IT project, for securely sharing health records via a QR code or a short URL. It builds on the earlier SMART Health Cards standard used by many COVID-19 vaccination programmes.
What it does: A SMART Health Link encodes a reference to a health data payload (often a FHIR bundle) that can be protected with a passcode and set to expire. Healthcare providers, patient portals, and discharge systems can generate a link or QR code that you can scan to receive your records — without needing to log in to a portal or manually export a file.
Where MyIPS uses it: The Scan QR / Paste Link option in Import uses SMART Health Links to retrieve records from a provider or portal. Both standard SMART Health Links and the older SMART Health Cards format are supported.
Learn more: docs.smarthealthit.org/smart-health-links